
How unnerving is it to migrate a MySQL database to another location?
If you did it before, how does it feel after the migration? Is it like you were dropped in a war-torn place? Explosions here and there? Guns blazing? With all the screaming, trauma, and losses, you may not want to do this again.
If it’s like a place you don’t want to come back ever again, hope is not gone. You probably need to iron out a few more stuff before you migrate a MySQL database again.
There’s an easy way, a road not taken. You may have made a wrong turn. This time, it won’t be horror and dread. It will be calm and cheerful. This article will make you wear the hero cape again.
We’ll do this in baby steps, but I promise it will be a walk in the park in the end.
We will start with an overview and the things you need to know first. Then, we’ll proceed to the easy steps.
- MySQL Database Migration Overview: To Migrate is Like a Digital Circus Act
- How Would You Know It’s Time to Migrate Your MySQL Database?
- Do’s and Don’ts in MySQL Database Migration
- MySQL GUI Migration Tool: The Key to Quick and Easy Way to Migrate MySQL Database
- How to Backup a MySQL Database GUI Style
- How to Restore a MySQL Database to the Target via GUI
MySQL Database Migration Overview: To Migrate is Like a Digital Circus Act
In simple terms, database migration is the process of moving your data from one system to another. It could be a copy of the same database to another server. Or you need to migrate your database to a new version of the database engine.
Whether it’s MySQL or another relational database, every bit and byte matters. Nothing essential should be left behind.
Sounds easy.
But here’s the thing: Data migration is like juggling flaming torches on a unicycle. It’s a daring act where you balance multiple elements (data). You try not to get burned (lose information) while riding the unsteady unicycle of transition. It’s a wild circus of tech, demanding skill, focus, and a touch of madness for a successful performance.
What could be the worst-case scenario?
It’s like attempting to juggle flaming torches on a unicycle during a hurricane. Picture this:
As you start your daring database migration, the hurricane of unforeseen issues hits. The flaming torches, representing your data, become erratic and uncontrollable. Some torches go out, symbolizing data loss. While others turn into wild, glitchy flames, representing data corruption spreading like wildfire.
The unicycle, your once-stable system, wobbles under the storm’s force. The integration is now in shambles. The intricate juggling routine, meant to be smooth and precise, turns into chaos. The hurricane of issues disrupts the planned migration steps.
In this digital circus of disaster, the worst-case scenario unfolds. A perfect storm of data loss, corruption, and integration failures – it’s a total breakdown of data migration. It’s a fiery spectacle gone awry, leaving your database in disarray.
See the migration challenges below:

The moral of the story: Anticipate potential storms and ensure your juggling act is resilient enough to withstand the unexpected hurricane of migration challenges.
6 Migration Steps for a Smooth Transition
Since MySQL migration is like juggling flaming torches on a unicycle, every move counts:
- Planning (Juggling Routine): Before you light up, plan your juggling routine. Know your torches (data). Understand the choreography (migration plan). And visualize a flawless act.
- Backup (Fire Extinguisher): Just as a juggler has a fire extinguisher on standby, back up your data. It’s the safety net, ready to extinguish any unexpected flames (data loss).
- Schema and Code Migration (Flaming Patterns): Start juggling torches of different sizes and colors – migrate schemas and codes. Each toss represents a part of the migration process, creating a mesmerizing pattern in the digital circus.
- Data Transfer (Precision Tosses): Now, with the torches ablaze, toss them with precision. Each toss signifies the transfer of data, ensuring a seamless flow in the fiery performance.
- Testing (Juggling Mid-Air): While juggling mid-air, test your skills. Check if the flaming routine is flawless. It’s like making sure you can juggle without dropping a single torch. The best-case scenario? Your app will run smoothly using the migrated database like it never happened.
- Switch Over (Grand Finale): For the grand finale, juggle the torches of the old and new databases. It’s the climax of the performance – transitioning from one set of flaming torches to another. At this point, you will say goodbye to the old and embrace the new migrated database.
In this fiery spectacle, mastering the art of juggling ensures a MySQL migration that dazzles the digital audience.
But how do you know when it’s necessary to migrate your MySQL database?
How Would You Know It’s Time to Migrate Your MySQL Database?
When data migration becomes necessary:
- System Upgrade or Replacement: When upgrading to a new system or replacing an existing one, data migration ensures a smooth transition of information.
- Technology Stack Change: If there’s a shift in the technology stack, such as moving to a different database system, data migration is essential for compatibility.
- Business Expansion or Restructuring: Businesses expand, undergo restructuring, or merge with another entity. Data migration is crucial to merge and align information.
- Performance Improvement: Your current system may face performance issues. If an upgrade or change can enhance efficiency, data migration becomes necessary for the improvement.
- Data Consolidation: There are scenarios where data is scattered across multiple systems. If this is true in your case, migrating data to a centralized location is necessary.
These are general ques when database migration becomes necessary. But in this article, we will consider a MySQL-to-MySQL data migration.
Do’s and Don’ts in MySQL Database Migration
Do’s
- Plan Thoroughly: Like plotting a treasure hunt, plan your migration meticulously. Understand your data, schema, and target environment.
- Back Up Regularly: It’s the safety net – regularly back up your data before and during migration. Imagine it as a data insurance policy.
- Test, Test, Test: Before the big migration day, run tests. It’s like a dress rehearsal – find and fix issues in the staging environment.
- Document Everything: Create a migration manual. It’s your map through the MySQL jungle – document every step and decision for future reference.
- Communicate Clearly: Be the captain of your tech ship. Keep stakeholders informed about the migration timeline, potential hiccups, and successes.
Don’ts
- Don’t Skip Backup: Skipping backup is like tightrope walking without a safety net. One wrong move, and your data falls into the abyss of potential loss.
- Don’t Underestimate Downtime: Downtime is the monster under the bed. Don’t underestimate it. Prepare stakeholders for potential disruptions during the migration process.
- Avoid Rushing: Rushing is the shortcut to chaos. Take your time with each migration step. It’s like cooking a gourmet meal – haste leads to a recipe disaster.
- Don’t Ignore Compatibility: Check compatibility between MySQL versions and your applications. Ignoring this is like trying to fit a square peg into a round hole – it just won’t work.
- Avoid Overlooking Dependencies: Dependencies are like dominoes – if one falls, others follow. Don’t overlook them; it can lead to a chain reaction of issues during migration.
Remember these do’s and don’ts, and your MySQL migration will be smoother than a well-played jazz tune.
MySQL GUI Migration Tool: The Key to Quick and Easy Way to Migrate MySQL Database
Using GUI tools in migrating MySQL databases comes with several advantages:
- User-Friendly Interface. GUI tools provide an intuitive and user-friendly interface. Data migration tasks become easier for both beginners and experienced users. There’s no need for extensive command-line knowledge.
- Visual Representation of Database Structure. GUI tools often offer visual representations of the database structure. It allows a graphical view of tables, relationships, and other elements. This visualization aids in understanding the database schema, facilitating efficient migration planning.
- Step-by-Step Wizards: Migration processes are often complex, involving multiple steps. GUI tools offer step-by-step wizards for common database tasks. Database migration is one of them. Wizards guide users through each migration phase. This will ensure a structured and error-free process.
- Automated Script Generation: Many GUI tools automate the generation of migration scripts. This is a timesaver. It also ensures consistency and accuracy in executing migration tasks.
- Error Handling and Logging. GUI tools typically provide robust error-handling mechanisms and detailed logging features. This helps users identify and address issues during the migration process. In the end, it improves the overall reliability.
- Cross-Platform Compatibility. GUI tools are often designed to be cross-platform, supporting various operating systems. This flexibility allows users to perform seamless migrations in different environments.
- Integration with Source Control. Some GUI tools offer integration with source control systems. It allows users to version and manage their database schema changes efficiently.
- Vendor-Specific Features. Tools like dbForge Studio for MySQL may provide additional features specific to MySQL. It enhances the overall migration experience and ensures compatibility with MySQL-specific functionalities.
In summary, GUI tools like dbForge Studio for MySQL simplify the migration process. It also enhances user experience. And it offers features that contribute to accurate and reliable database migrations.
dbForge Studio for MySQL Database Migration Features
dbForge Studio for MySQL is the MySQL migration tool of choice for experts in this field. It offers GUI features to migrate MySQL databases quick and easy. Even more, it’s not just for MySQL but for MariaDB too. There’s no need to know the command-line syntax for mysqldump and MySQL CLI.
Here are the main database migration features:
- Copy Databases: If you need to transfer the same database to another server, this is the easiest option. But remember that the MySQL version of the target should be the same as the source.
- Backup and Restore: This is like the GUI equivalent of mysqldump for backup and MySQL CLI for restore. You can backup and restore select tables and other objects or the entire database.
- Import/Export: If you need to migrate data from and to MySQL database using other file formats like CSV, XLS, MDB, and more.
Compatibility and Usability
dbForge Studio for MySQL has broad compatibility when dealing with MySQL and MariaDB in the cloud. So, if you need to migrate your database from on-premises to the cloud, this is the tool of choice.
All features use a simple, wizard-based GUI interface so you can go back and forth one step before migrating.
Later, you will learn about the steps using the backup and restore features with pictures.
dbForge Studio for MySQL also has an amazing SQL code editor. You can use this to create a customized migration script for a target database with a new structure. It can reduce the coding time and make you more productive. You can use the output script of the backup feature to start with. Or start from scratch. Create a script for the number of objects you need from the Database Explorer.
In summary, you can migrate MySQL data in dbForge Studio for MySQL using 3 methods. These methods are effective on the following targets:
- A new on-premises server with the same MySQL version.
- A new on-premises server with a new MySQL version.
- MySQL in the cloud for various cloud platforms.
- Same server but a different database name.
- Different data formats.
How to Backup a MySQL Database GUI Style
Using a dbForge Studio for MySQL as your migration tool follows steps in a wizard interface. We’re going to discuss those steps here. This covers Step 2 from the 6 Migration steps outlined above.
Our sample scenario will migrate a WordPress database from an Ubuntu server to a Windows 11 MySQL instance.
STEP #1: Trigger the Backup Task from the Main Menu
From the main menu, click Database -> Tasks -> Backup Database. See the screenshot below:
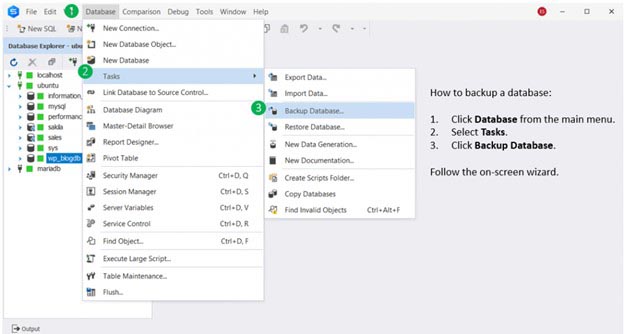
Another option is to right-click the database you want to back up from the Database Explorer. Then, select Tasks. And finally, click Backup Database.
From here, you follow the on-screen wizard. Let’s discuss each in the next steps.
STEP #2: Specify the Source and Target
Then, you need to tell dbForge Studio the backup information. Because the backup routine will give you an SQL file containing the script for restoring the database in your target server later. This is similar to mysqldump if you’re going to use the command-line interface.
So, specify the server, database to backup, and the path and file of the output SQL file. See the figure below:

After setting the needed information, you can either click Next or Backup. Clicking Next will allow you to set further options for the backup. But clicking Backup will start the backup process.
STEP #3: Choose What to Backup
This step will allow you to choose the objects to back up and to include data or not.
See a sample of this below. You can expand each of the object folders if you want to choose specific object names.

You can either click Next if you want to set more options. Or click Backup to start the backup process.
STEP #4: Choose Other Options for the Output Script
There are some more options you can tell dbForge Studio for MySQL about the output SQL script. You can choose to add comments or not. Or disable constraints, like foreign keys, or not. Or even script the users and roles from the source database to the target. It’s all up to you.
See a sample below:

STEP #5: Choose Error Handling and Logging Options
There can be errors in generating the script, especially for large databases. Tell dbForge Studio for MySQL what you want when an error happens. You can either abort the script generation, ask you what to do, or ignore the errors. Again, it’s up to you.
See the sample below:

At this point, you have no more options to choose further. If you need to change something, click Back. But if you’re ready, click Backup.
If you proceed to backup, you will see a progress indicator as the backup process progresses. See it below:
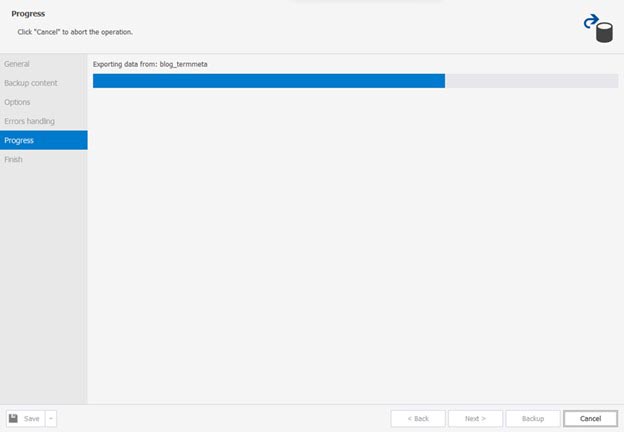
When it’s done, you have the option to view the script created or not. Whatever you choose, you can end the backup task by clicking Finish.
See a sample below:

How to Restore a MySQL Database to the Target via GUI
You have the backup script file sitting in your favorite backup folder. So, it’s time to restore it to your target location using dbForge Studio for MySQL. You don’t need to copy the script to another location. You can restore the database backup to another target in the GUI.
This step covers steps 3 and 4 of the 6 Migration steps outlined above.
The restore steps are shorter than the backup steps. Check them out next.
STEP #1: Create a Blank Database
From the Database Explorer, choose the target connection where you will place the database to migrate. Then, create a blank MySQL database. The restore process will write to this database using the SQL script created during the backup.
To do that, right-click the target connection from the Database Explorer. In this case, it’s localhost. Then, click New Database. You need to give it a name and click Apply Changes. I named it wordpress_db for this demo. See it below:

You may need to refresh the list of databases in the Database Explorer to make this new blank database appear. To do that, right-click the target connection (localhost), then click Refresh.
STEP #2: Overwrite the Blank Database Using the Backup SQL Script
To do this, right-click the blank database (wordpress_db). Then, select Tasks and click Restore Database. And then, you will see a window like the one below:
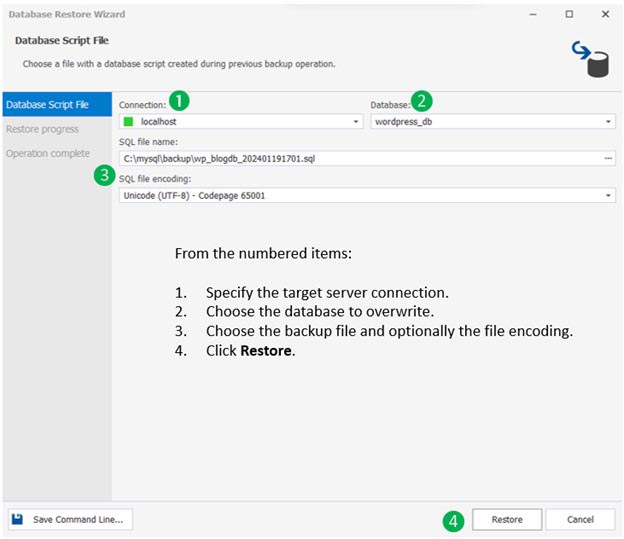
At this point, the target connection and database are ready. So, you now need to specify the backup SQL script file. Then, click Restore.
The next thing you will see is a progress indicator as seen below:

Wait until the restore process is complete. Then you will see the window below when it’s all good:
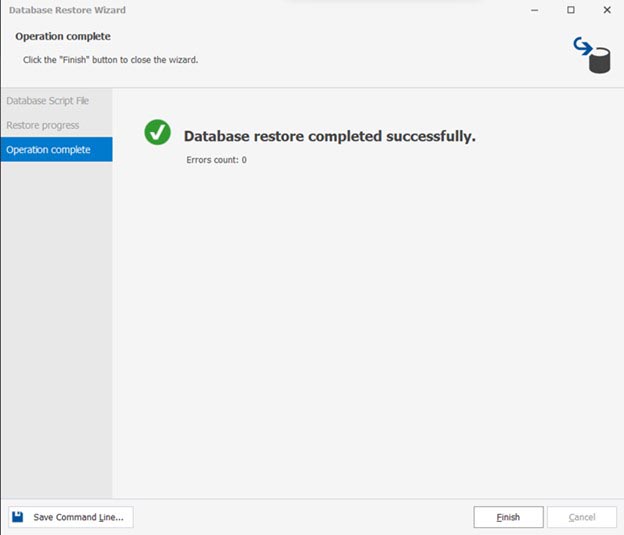
Finally, you can click Finish. The task to migrate MySQL database is complete at this point.
Takeaways
Moving a MySQL database is a serious database task. We have seen that planning is crucial. We need to prepare for the problems we may encounter during the migration. However, we learned that this is not an impossible thing to do.
GUI tools like dbForge Studio for MySQL simplify the process of migration. We did a simple migration of a WordPress database from its source to a local MySQL instance. Of course, there are more complex scenarios but this MySQL database tool is up for the challenge. You can use the SQL code editor to modify the backup script. Or create the migration script from scratch.